Solar Eclipse Model: DIY Paper Craft {free printable}
Get ready to bring the wonders of the total solar eclipse right into your home with our DIY Solar Eclipse Model Craft! 🌞🌑
There's something truly magical about witnessing a solar eclipse – the way the moon perfectly aligns with the sun, casting a shadow over the Earth and turning day into night, is a sight to behold. And now, with our fun and educational craft activity, your little ones can experience the magic of a solar eclipse firsthand!
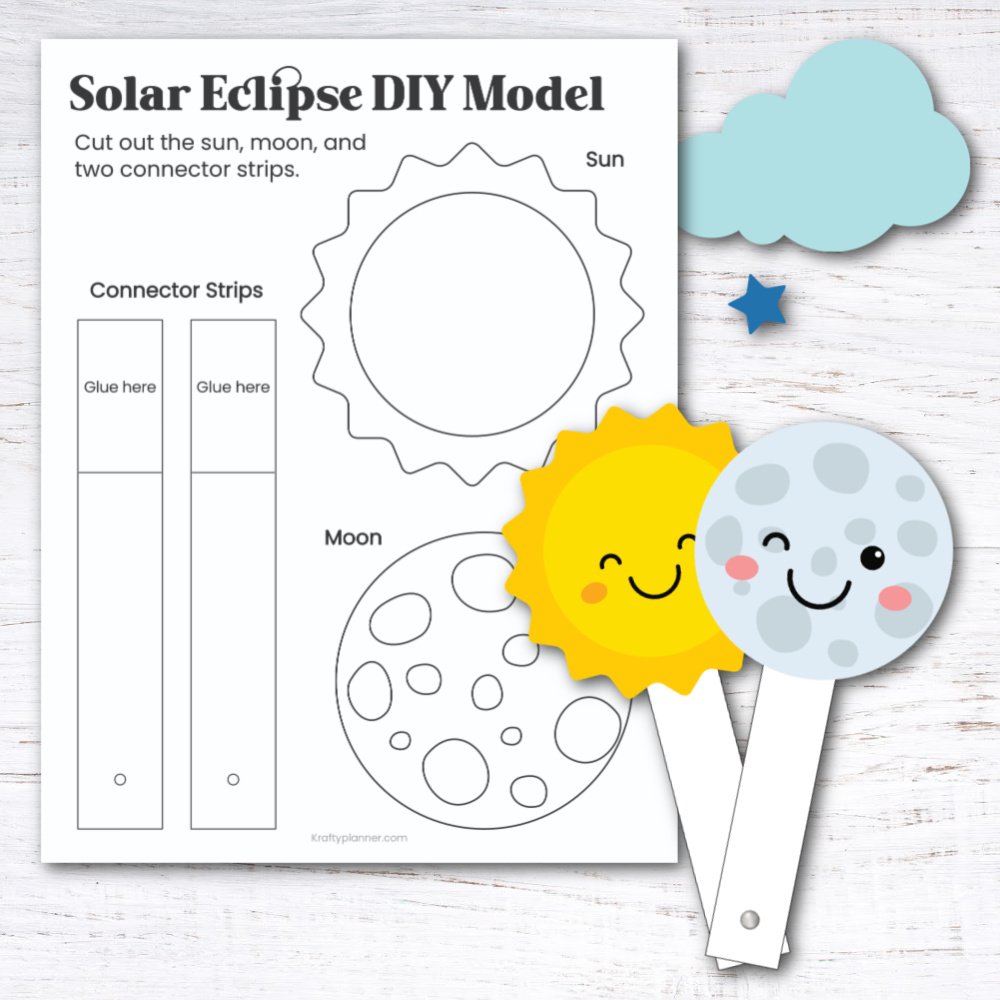
In this craft, kids will get to color, cut, and assemble their very own sun and moon models, complete with connector strips to mimic the celestial dance of an eclipse.
With just a few simple materials and a dash of creativity, they'll be able to create a tangible representation of this awe-inspiring phenomenon.
Here’s a look at what you will need…
SUPPLIES
Sun, moon, and connector strips printable
Glue
Scissors
Brass fastener
Crayons
INSTRUCTIONS
Color the sun and moon pictures
Cut out the sun, moon, and two connector strips
Glue the moon to the top of one of the connector strips
Glue the sun to the other connector strip
Use a pencil or a brass fastener to punch a hole through the marked areas at the bottom of each connector. The moon should be placed on top of the sun
Model how the moon blocks the sun’s light during a solar eclipse by moving the moon over the sun.
Not only is this craft a fun way to get creative, but it also provides a hands-on learning experience about the science behind solar eclipses.
As they manipulate the moon model to block out the sun's light, kids will gain a deeper understanding of how eclipses occur and why they're such a rare and remarkable event.
So gather your little astronomers, break out the art supplies, and let's embark on a cosmic adventure together! Download our printable template and get ready to bring the magic of the solar eclipse to life right in your own home.
Download your DIY Solar Eclipse Model below
Free Printable: Solar Eclipse Worksheets
SUPPLIES I RECOMMEND FOR PRINTING
A PRINTER
If you’re going to be printing in color, I really recommend investing in an HP Instant Ink-compatible printer. The quality of the finished product is amazing! If you don’t need a color printer, I highly recommend a laser printer like the Brother L23 Series. You will save hundreds on ink. You can also get a color laser printer which I would LOVE to have!
PAPER
For everyday printables, planners, and coloring pages for the kiddos I normally use Hammermill Printer Paper, 20 Lb. I love that you can get a small box of 3 reams instead of having to buy one at a time or a whole case of 10.
If I want something a little nicer, I use this laser paper which is incredibly smooth and has very little to no ghosting on the other side. This is perfect if you like to use pens/markers that are prone to bleeding through to the other side.
For printing on A5 paper, I use this Blank 6-Hole Punched A5 Paper. You can also get it without the holes but it’s $6-7 more. Which I think is odd because it’s usually the other way around and you have to pay more for the hole punching.
If you're printing a binder cover that is fade-resistant and lasts a long time, I would recommend the best paper using Epson Presentation paper. It's heavy like cardstock (48 lb), is great when laminated, and is made to last for decades.
BEFORE YOU GO:
Here are a few more posts you might like:
See my Link Party Directory for a current list of blog parties I attend each week.
FOR PERSONAL USE ONLY – Please Read Freebies Terms of Use.
(This post may contain affiliate links. For more information, see my disclosures here.)
~ SHARE THIS POST ~
Did you like this post? Do you know someone else who might enjoy it? Please take a minute to share it on Pinterest, Facebook, or your favorite social media… Thank you!
